You really should have a tank for any good onboard air setup. This ensures that you still have air if your engine dies, and it lets you run things like air tools that suck more volume than your compressor can put out.
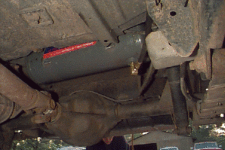
Some people weld shut the ends of their tube bumpers, nerf bars, or roll cages and tap a hole to mount the air fittings. For example, a 36″ long, 3″ diameter tube will hold 1.1 gallons of air. This is a great idea, if you have such things on your vehicle. I don’t (yet). Many people go to truck wrecking yards and pick up used air brake tanks for cheap. I opted for a used 6″x19″, 2-gallon tank from an old portable air compressor rated at 125 psi. I picked this up at a local air compressor repair shop for $30. It even came with the necessary brackets already welded onto it, as well as two threaded holes containing a drain plug, quick disconnect fitting, and 150 psi pop-off safety valve. I just had to drill the mounting holes and cut off any brackets I didn’t need.
The next trick is tank placement. Some people put the tank inside the vehicle, but then you have to run the air lines through the firewall to reach the compressor. It’s also a safety hazard if the tank gets over-pressurized or dented and explodes. In a small vehicle like my YJ, inside space is at a premium, so I didn’t want to waste it with a permanently-mounted air tank.
That left three good spots that I could find on my YJ:
- Just behind and to the right (passenger side) of the radiator, in front of the fender well.
- Behind the right fender well, underneath the battery tray.
- Under the body tub, above, in front of, and parallel to the rear axle.
Each spot is a different shape. The best choice depends on the shape of your tank and the amount of other stuff in your engine compartment. I chose to mount my tank by the rear axle. The maximum diameter of a tank in this position is 6″ if you want to avoid hitting it with your pinion yoke. I’ve already got scrapes on my tank from where the driveshaft yoke has scraped it, so a larger tank definitely won’t fit here without lowering your bump stops.
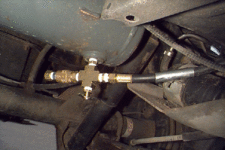
When mounting your tank, it’s important to have an outlet at the lowest point on the tank so you can drain moisture from it periodically. Regardless of what filters you have on the line, unless you live in a zero-humidity environment, water will condense on the inside of the tank when it depressurizes. When I mounted my tank, I used a single hole on the bottom “side” of the tank for both input and output. I simply used a four-way cross connector that had the top connected to the bottom of the tank, the hose to the compressor coming out one side of the cross, a drain plug on the bottom of the cross, and a quick-connect fitting on the other side. This turned out to be an utterly useless location for a quick-connect fitting. I never used it in 6 years, and when I finally removed it, I found that it had been corroded shut. A better plan would have been to run a hose from the tank up through the body tub, then mount a quick-connect inside the cab near the driver’s door so I wouldn’t have to pop the hood every time I wanted to air up.
I zip-tied the hose to the brake and fuel lines running along the inside of the frame rail and up into the engine compartment. The hose then ran along a lip on the bottom of the firewall just above the bellhousing (I drilled a hole in this ledge and zip-tied the hose to it to ensure it wouldn’t fall off and lie on anything hot. I coiled the extra foot or two of hose up under the battery tray, and then ran the end of it under the alternator to the front of the passenger fenderwell where the rest of the air fittings were located. This requires about 12′ of hose; I picked up 15′ of 1/4″ hose for $7 from the local Surplus Center. [UPDATE: I now recommend using strictly 3/8″ hose instead of 1/4″, since high-volume tools like impact wrenches like to use a lot more air than the 1/4″ hoses can handle.]
UPDATE: Six years after my initial install (March 2004), I decided it was time to install a ladder bar on my rear axle to counteract the axle wrap I was getting from my SOA conversion. Since the ladder bar had to live in the same space that was currently occupied by the air tank, the tank had to be relocated. As I write this, I have not yet installed the ladder bar or found a new location for the tank. The tank has already been removed, though, to allow clearance for installing my new upper shock mounts.
I haven’t found a place where my old tank will fit, so I’m thinking I may just get a 24″ section of 3″ diameter pipe, cap off both ends, and use that for my tank. I could mount that to the top of my skid plate between the t-case and the left side frame rail. It’ll be smaller than the old tank (only 3/4 gallon), but that should be good enough. It just means the compressor will have to cycle on and off more often. The hard part is how to install the drain cock on the bottom of a horizontal pipe…
Do you like this site?
Help me keep it going by throwing a few pennies my direction.
![]()
![]()
![]()
![]()
Links on this page to Amazon are part of an affiliate program that helps keep Jedi.com operational.
Thank you for your support!


