www.flickr.com
|
Black and White Photography Pointers
Why and When to Use Black & White
Early photographers -- during the first 100 years of the technology -- shot in black and white because it was the only thing available to them. This is the primary reason that most of Ansel Adams' great photos are in B&W. It wasn't until the late 1930's that color film became readily available. Still, many photographers prefer B&W photography because it produces a simpler image that allows the viewer to concentrate on what the photographer was trying to communicate through the photo.
When should you use B&W? B&W allows the viewer to concentrate on shapes, textures, and contrast. Sometimes color adds very little to the message communicated by the image, and in those cases, it's best to remove the distraction. This isn't always the case, of course; B&W would be a poor choice for a hot air balloon festival. B&W film has a greater dynamic range than color film (which, in turn, is greater than most digital sensors), which enables it to show greater detail in the highlights and shadows. B&W photos frequently exude a timeless quality because we naturally associate them with the older, pre-color era. In digital photography, sensor noise occurs independently in the three color bands. By merging the three bands together into a single intensity value (think of it as averaging the three bands together), this noise is reduced, making B&W more forgiving of high-ISO noise than color and therefore preferable for low-light photography. B&W obviously cares nothing about white balance, so the difference in light coloration between flash, daylight, and incandescent light isn't recorded.
Modifying Color Response With Filters
Digital cameras will record B&W images, but they always shoot in color, then do the conversion in software before saving to the flash drive. Conversion from color to B&W (in either digital or film) records just the intensity of each color. Hue and saturation information is lost. Many colors which appear quite different and sharply delineated in color still have the same intensity, and will therefore be indistinguishable in B&W.
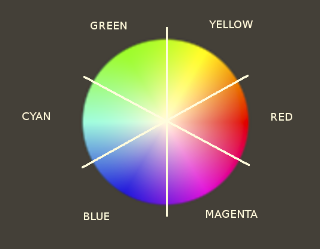 In order to provide some distinction between pinkish-orange skin tones
and a blue sky, you need to change the relative intensities of blue and
orange. This is accomplished through colored filters. When using an
actual glass filter that screws to the front of the lens,
a colored filter allows its own color of light to pass uninhibited, but
will reduce the intensity of the opposite hue on the color wheel. For
example, an orange filter will allow orange objects to retain their full
brightness, but will darken blue and cyan objects. This darkening is gradual --
colors half way around the color wheel will be darkened to a lesser degree.
Colored filters come in varying intensities; the stronger the filter color,
the darker the opposing color will become.
Yellow, orange, and red filters are commonly used in portraits and landscapes to lighten skin tones while darkening blue skies and green vegetation to make people stand out. By darkening the sky, they also make white clouds stand out more (polarizing filters will also do this). This has an added benefit when struggling to maintain detail in a high-contrast, outdoor scene. Since the sky is often the brightest object outside, darkening it with an orange filter will compress the overall dynamic range of the scene and allow you to brighten the shadows for improved detail at both ends.
At the same time, a yellow/orange/red filter will also appear to slightly darken the shadow areas. Direct sunlight has a slight reddish tint, while shade has a slight bluish tint. The same filter that darkens a blue sky will also darken shadows slightly.
All digital cameras will allow you to save your photos as a B&W JPEG (sometimes referred to as "monochrome" or "greyscale"). Many DSLR's (including the Canon Rebel XTi/400D) will allow you to apply filter effects to this image directly in the camera. That's great, but if all you're recording is the JPEG, you're now forever stuck with whatever settings you applied in the camera. You have no ability to experiment with different settings when viewing the image on your computer. You're better off recording the image in color so that you can experiment on your computer with different filters, tonal contrast, etc. You want to leave your options open by providing yourself with as much information as possible. Raw images take care of this, as they're a straight dump off the image sensor and don't contain any of the creative effects (including sharpening or noise reduction) that the camera might apply to the corresponding JPEG. Recording images in raw+JPEG (an option in newer DSLR's) allow you to have the flexibility of a raw image while still being able to record the JPEG using the creative impulses you had at the time. The drawback is the size requirement; raw+JPEG files require 4 to 5 times as much storage space as a JPEG alone.
For example, on my XTi, I have a custom effect setup that automatically makes a monochrome image through an orange filter and then performs a slight contrast stretch. Virtually all of my B&W images are shot raw+JPEG with this custom effect applied. Most of the time, the JPEG is good enough as recorded, but it's indispensable to have the raw image available when the recorded JPEG just doesn't cut it. For example, if the camera's contrast stretch has lost details in the shadows, there's nothing I can do to retrieve those if all I have is the JPEG. I also tend to forget to change my camera from B&W back to color when I'm done shooting, so having the raw image is a nice safety net for those times when I accidentally capture a B&W photo of a scene that I intended to be color.
Note that applying colored filters when converting to B&W is a feature that often isn't present in low-end image editing software. If your favorite software doesn't have this feature, you may have to settle for the capabilities inside your camera, shell out the cash for more capable software, or invest in the learning curve for a more capable operating system that provides such software for free.
Also note that when applying filter effects digitally, you're still subject to the dynamic range of the original raw image as recorded through the lens. If your scene had too much contrast to record details at both ends in the raw image, applying filter effects digitally won't completely fix that (although it may help). To retain the most detail when trying to compress dynamic range, you have to use a physical filter attached in front of the lens. Of course, this reduces your flexibility in postprocessing because the sensor is now recording the modified colors. You need to choose which issue is more important for each situation.
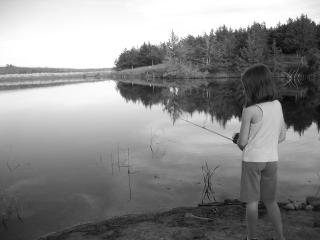
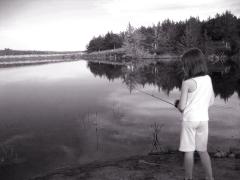
In the following photos, watch the effect that the filters have on the brightness of certain areas. The upper left photo is the color original. The upper right photo is the B&W rendition with no filters applied. The lower right photo uses a strong green filter. Note that the sky and water are a bit brighter and that my daughter's pink outfit is darker (she almost disappears into the shot). The lower left photo uses a strong red filter. Note how the sky and water are darker with more pronounced clouds, my daughter's outfit is much brighter, the distant trees have more contrast, and some brown foliage along the far shore stands out more.
| Original | 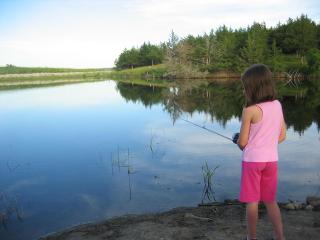 |
 | No Filter |
| Red Filter | 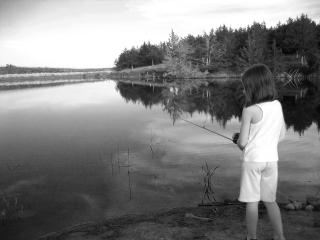 |
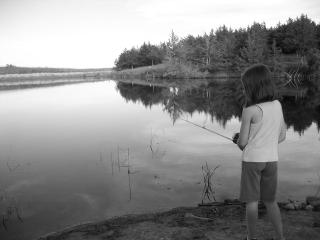 | Green Filter |
|
Excited about what you've learned? Shop for lens filters at 
|
Coloration of Final Print
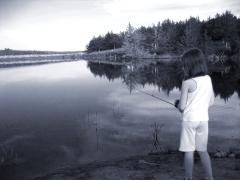
Although we call this "black and white" photography, a more accurate technical description is "monochrome," meaning "single hue." Photographers have long been tinting their B&W photos to influence the mood of the scene. Although such images still use varying shades of just a single hue, the mid tones take on a color other than grey.
Most people are familiar with sepia toned images, which adds an orangy-brown tint to the photo that we tend to associate with antiquity. Many digital cameras will even create this effect for you as an option when shooting B&W. In reality, there is no limit to the number of hues which can be used to tone an image. Which one you use depends on personal taste and the mood you're trying to set.
Warmer tones are generally used for portraits and photos with a comfortable, nostalgic feel. They include (in order of decreasing saturation) sepia, brown, and platinum. Cooler tones can produce a more isolated, mechanical feel. Popular cool tones include selenium and blue. Any hue can be used, of course. For example, a slight red tint can produce a hot, sultry feel.
Most photo editing software will allow the user to change the color tint of an image, regardless of whether it's B&W or color. Their interfaces for doing so vary widely, so consult your users' guide if you need help.
The intensity of the coloration can be varied, but don't over do it. Coloration should help carry the viewer toward the photographers intended message, not distract them from it. If the viewer's first reaction is, "Wow, look how that image is colored," then they've missed the point of the photograph, and the photographer has failed in his/her attempt at communicating the intended idea.
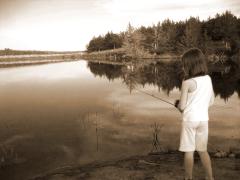
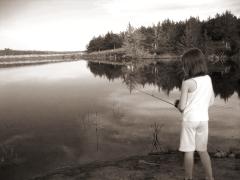
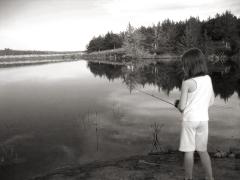
|
Excited about what you've learned? Shop for Adobe photo editing software at 
|
Exposure, Detail, and the Zone System
Because color information isn't available to help distinguish details, it's more important to get your exposure correct so that you don't lose detail in the shadows and highlights. Ansel Adams, perhaps the most famous photographer of the twentieth century, developed his "zone system" to address this issue.
In a nutshell, the zone system divides up the intensity range up into 11 zones, with zones separated by one f-stop. Zone 5 is medium grey. Your camera's automatic exposure meter will attempt to put the average scene brightness at zone 5. At zone 2 (-3ev, three stops below medium grey), you've lost most of your shadow detail. At zone 8 (+3ev, three stops above medium grey), you've nearly blown out your highlights and lost most of the detail there. Ideally, you want to to expose your photo so that your darkest shadow detail is at zone 3 (-2ev) and your highlights are mostly at zone 7 or 8 (+2 or +3ev). The following table describes the various zones:
| Zone | Description |
|---|---|
| 0 | -5ev: Pure black |
| I | -4ev: Near black: slight tonality but no texture |
| II | -3ev: Textured black: the darkest part of the image in which slight detail is recorded |
| III | -2ev: Average dark materials and low values showing adequate texture |
| IV | -1ev: Average dark foliage, dark stone, or landscape shadows |
| V | 0ev: Middle gray: clear north sky, dark skin, average weathered wood |
| VI | +1ev: Average Caucasian skin, light stone, shadows on snow in sunlit landscapes |
| VII | +2ev: Very light skin, shadows in snow with acute side lighting |
| VIII | +3ev: Lightest tone with texture: textured snow |
| IX | +4ev: Slight tone without texture: glaring snow |
| X | +5ev: Pure white: light sources and specular reflections |
Many hard core photographers use a "spot meter" to test the brightness (exposure) of just a single spot (like a bench or tree trunk) instead of the entire scene. Some DSLR's have spot meters built in. A spot meter tells you the correct exposure to put that spot at medium grey, and you then simply reduce the indicated exposure by 2 stops to put that spot in zone 3 in your final photo.
Film photographers often use the mantra, "Expose for shadows and develop for highlights." The development time and printing paper have quite a bit of influence on the total contrast, and therefore the highlight brightness. As long as your camera's exposure is bright enough to allow details in the shadows, film developers can generally obtain acceptable highlight detail and brightness in the darkroom.
Digital sensors don't have quite the same latitude that film does, but if shooting raw with a high bit depth, you can still adjust your contrast and total brightness by as much as 2 stops on the computer using a curves adjustment as discussed in the talk on histograms. However, it's still important to expose bright enough to obtain sufficient shadow detail without the curves adjustment. Because digital sensors are linear recording devices and the human eye perceives light non-linearly, the sensor will record more bits of precision in the bright end of the spectrum than in the dark end. As you may have experienced in the last homework, brightening the dark end of the histogram yields a rather noisy image, while reducing the brightness of the high end still yields good detail.
All this is yet another reason for the "expose to the right" technique. If you expose your image so that the highlights reach as far to the right as possible without blowing out, you'll be assured of retaining as much detail as possible throughout the entire range of intensities in your image. You can always adjust your exposure in software to pull your shadows down where you want them in such a way that they still have plenty of detail when they get there. To use ETTR with a spot meter, you'd want to measure a highlight and put that in zone 7 or 8 (+2 or +3ev) depending on scene contrast. Measure a shadow spot as well, but don't worry about its measurement unless your desired exposure would put it below zone 3. If it would, increase your exposure as necessary so that you can retain an acceptable amount of detail in both the shadows and the highlights. If you don't have a spot meter, you can take a test shot, examine the histogram on the camera, and adjust the exposure for the next shot as necessary to slide the histogram up to the bright end of the scale. This is easier to do when shooting inside than outside, since indoor lighting (flashes excluded) are far more dim than even indirect sunlight and therefore provide a much smaller range of intensities.
Do you like this site?
Help me keep it going by throwing a few pennies my direction.
Back to Obi-Wan's photography page
or visit Prairie Rim Images
last updated 29 Jan 2009 Obi-Wan (obiwan@jedi.com)
Links on this page to Amazon are part of an affiliate program that helps keep Jedi.com operational. Thank you for your support!

