
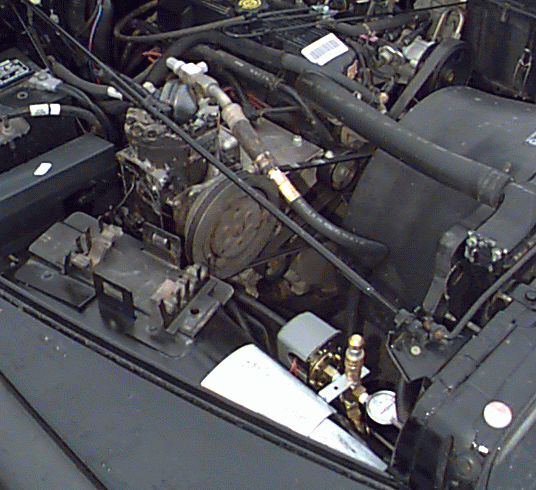
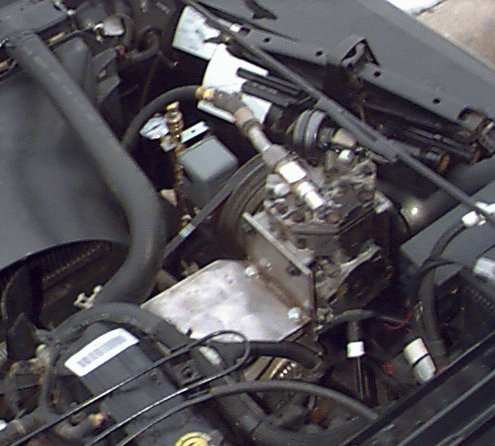
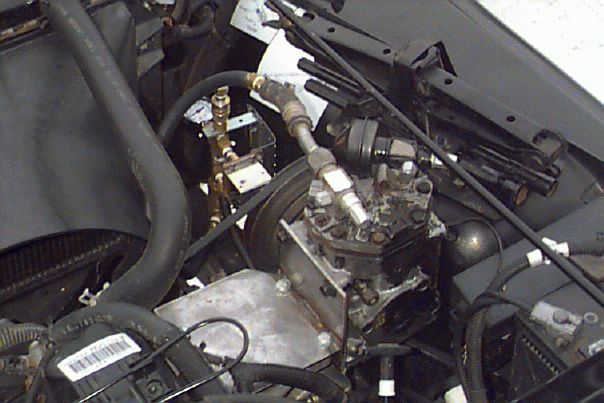
I chose to mount the hose connectors and stuff on the inside of my front right wheel well near the factory jack. That location provides easy access and also keeps everything above the water line should I decide to ford any rivers.
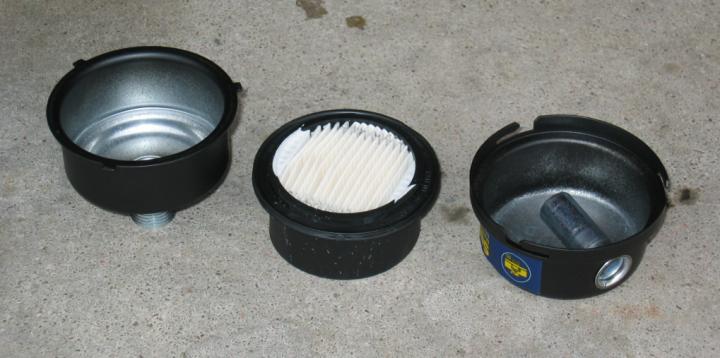
The input hose on the York compressor needs to run to an air filter. I used a $4 crankcase filter (Fram part BA3631) that looked like it would match up well to my intake hose. A foot or so of electrical tape fastened it to the metal part of the intake hose connector.
If your compressor leaks any oil out through the output hose, you’ll want to install an inline air filter between the compressor and the rest of the system. This should trap any oil, water, or anything else that you don’t want getting blown into your tank, tires, or tools. It doesn’t look like my compressor has this problem, so I opted to save $20 and skip the filter.
The output hose from the York (or the filter, if so equipped) needs run to a check valve that prevents air from the rest of the system from flowing back into the compressor. If this were allowed to happen, the compressor would have to work much harder to start up initially.
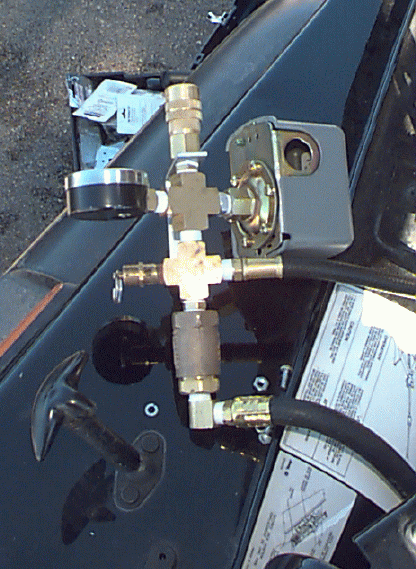
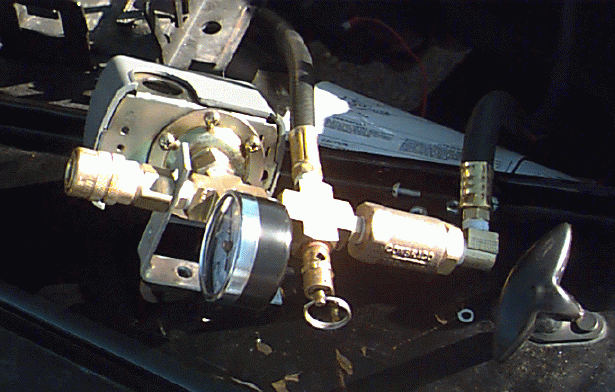
On the system side of the check valve, I installed a pressure switch. This switch turns the compressor’s clutch on when the pressure in the system drops to a certain level, and turns it off again when the pressure climbs to a certain level. Many pressure switches have preset on and off levels, but I found one at a surplus center for $17 that has variable settings I can adjust myself. The difference between on and off is preset to about 15-20 psi. I adjusted the turn on pressure to about 90-95 psi for now, putting the shut off pressure at just under 110 psi. If you’re using this compressor to power your ARB air lockers, you must keep the pressure between 80 and 105 psi.
Next to the pressure switch, I installed a 160 psi pressure gauge. Make sure you mount this such that it will be easily visible in less than optimal lighting without sticking your head down into a running engine. Mine ended up just rearward of the right headlight, lying sideways and facing straight up.
Somewhere around here needs to be a pop-off safety valve rated the same as your wimpiest piece of hardware. In my case, the 125 psi tank was the limiting factor. If the pressure reaches a certain level, this valve will pop open to release the extra pressure before something more critical explodes.
The last piece was a 1/4″ NPT quick-disconnect fitting to which I can attach the air hose of my choosing. I picked up a 25′ long 1/4″ rubber air hose at the local surplus center for $7. (The spring-coiled hoses just don’t stretch far enough to reach all four tires.) One end of the hose needs a male fitting for the quick disconnect, and the other end needs a female end. Don’t forget to get an air chuck to attach the hose to your tire stems. If you have a tendency to splash water, mud, or other crud around your engine compartment (or near the rear axle, where I mounted a second quick disconnect), then you’ll want to keep that stuff out of your air fittings. I got two mail quick disconnect fittings and capped them off to use as plugs in the female fittings when I’m not using the air system for more important things.
This whole mess is attached to my fender well with an angle bracket and a couple bolts.
UPDATE: About 6 years after the initial install (March 2004), I made some changes to this setup. First, I ditched all the 1/4″ hoses and quick connect fittings and upgraded them to 3/8″ hoses and 3/8″ “T”-style (automotive) quick connects. The larger hoses and fittings only cost a little bit more, and they flow twice as much air as the 1/4″ stuff. While 1/4″ is fine for filling tires, a high-volume tool like my 600 ft-lb IR2131 impact wrench really wants a lot more air than the 1/4″ quick connects and hoses will allow. I did stick with the 1/4″ NPT threaded fittings, though, since the inner diameter of those fittings is the same as the 3/8″ quick connects. Using 3/8″ NPT fittings greatly increases the cost and reduces the parts availability.
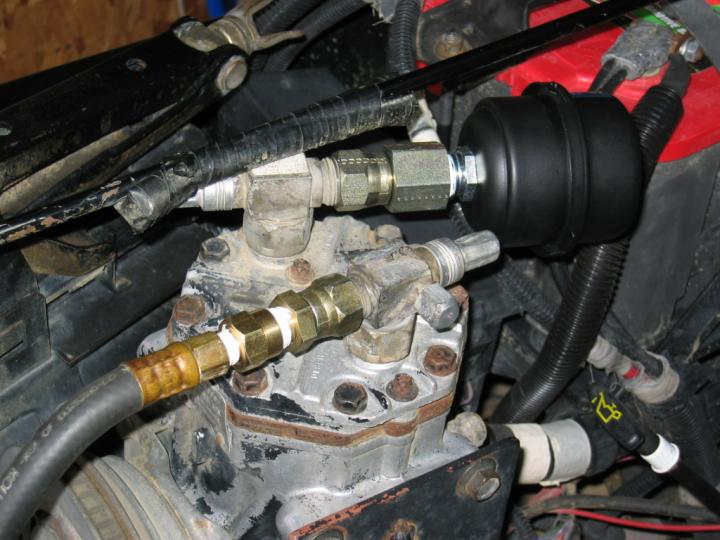
At that same time, I also reworked how the intake filter and discharge line connect to the compressor. There are two types of York upper fittings: flange mount and “tube-O” (a tube inside a rubber O-ring). Mine was a tube-O compressor. I kept the horizontal AMC-style fittings that connect to the compressor head, since those tube-O threads are an odd size. However, I removed the hokey, taped-on intake filter as well as the section of original A/C line on the discharge side. The threaded fittings that remained are standard 45-degree flared gas line (JIC) fittings. The intake fitting is 1/2″ (-8) and the discharge fitting is 5/8″ (-10). I swapped the factory fittings side to side so that the larger fitting was on the intake. I figured the discharge side was only 3/8″ through the rest of the system, so it may as well use the smaller fitting at the compressor while allowing the intake side to breath better with the larger fitting.
On the intake side, I bought a new Solberg FS-06-050 air filter from Grainger for $15. (Kilby also sells a similar model). This filter is rated for 10 CFM, which should be plenty. I attached it to the factory JIC fitting using a 5/8″ flare to 1/2″ NPT adapter that I got for $7.50 at a local hydraulic supply shop (Grainger sells them, too, but only in packs of 10).
On the discharge side, I used 1/2″ flare to 3/8″ NPT fitting and a 3/8″ to 1/4″ NPT reducer to mate the factory fitting directly to my air hose, instead of using the length of A/C hose with a barb fitting. It looks much cleaner, and only cost about $9.
Electrical Connections
In addition to the pressure switch, you should also have a master switch somewhere in the battery / pressure switch / clutch circuit so that your battery doesn’t go dead if your tank gets low while the engine isn’t running. A lighted switch run through the firewall to your dashboard is probably a good idea.
I used a big, lighted SPST rocker switch screwed to an angle bracket on the bottom of my dash (just under the climate control levers). Being lighted, it’s easy to see at a glance whether it’s on or off, but at night, that bright red light is quite blinding. I recommend getting a smallish switch whose glow won’t ward off oncoming aircraft.
The wire ran from the upper-left-most accessory plug in my under-dash fuse block to the rocker switch. I used an accessory plug so that the circuit would be switched by the ignition key; there’s obviously no point in engaging the compressor clutch if the fan belts aren’t turning. It then ran from the switch through the rubber grommet above the accelerator through which all the other dash wires run into the engine compartment. Just use a small knife to cut the smallest slit possible in the rubber grommet that will still allow your wire to pass through. The wire then ran along the front of the firewall to the passenger side fender well and then up to the pressure switch. The last leg runs from the pressure switch to the positive wire running out of the compressor.