
One big problem with vehicles that see lots of abuse, especially those that live in winter climates with salty roads, is rust. Any dents or deep scratches that expose bare metal will eventually rust. While the problem is most obvious on the outside of a vehicle, the inside of your body tub is just as susceptible to damage if you carry lots of tools or parts around with you. Stuff tends to slide around and rub against painted metal, quickly turning it into unpainted metal.
Many Jeepers that I know have combatted this problem by covering the inside of their vehicle’s body with some sort of paint-on pickup bed liner. There are numerous brand choices for those wanting to do this, ranging from $50 for a few quarts of JC Whitney no-name, do-it-yourself liner to as much as $700 for professionally-applied Rhino Liner. Below is a summary of the liner choices I’ve seen and the popular opinion of what they’re like.
- Rhino Linings Tuff Stuff:
The Big Dog of bed liners. This professionally-sprayed-in liner can applied up to 1/4″ thick. It’s got a rough texture and is fairly flexible. I’ve heard franchise dealers quote from $300 to $700 to line a Jeep tub. Removing seats, bolts, etc. yourself can cut the cost down. It comes in various colors. They’ll send you a free sample if you ask.
Rhino Linings
9151 Rehco Road
San Diego, CA 92121
1-800-447-1471
http://www.rhinolinings.com - Line-X: Similar to Rhino in cost and application procedure. Line-X has a finer texture, and isn’t quite as flexible. It can be sprayed from 1/16″ to 1″ thick. They’ll send you a free sample if you ask.
Line-X Corp.
2550 S. Garnsey St.
Santa Ana, CA 92707
1-800-831-3232
http://www.linexcorp.com - Lava-Liner: Roll- or brush-in DIY liner. It runs about $75/gal, and 1.5-2 gallons should cover the inside of your tub with a 1/8″ layer. I hear it has a smooth surface, as opposed to the rougher surface of most liners.
Lava-Liner, Ltd
98 Main Street Suite 418
Tiburon, CA 94920
1-800-269-8077
http://www.lava-liner.com - Durabak: A do-it-yourself liner applied with a brush, roller or spray gun. It uses ground-up tire bits for grit. One $100 gallon (black, $120 for a wide variety of colors) will cover the inside of your tub. It’s nice & rough and quite indestructible, but it’s also really thin. It won’t cushion blows from dropped tools or dampen noise at all. There’s some residual odor from the application that tends to last a while in an enclosed cab. The texture is similar to JC Whitney’s fine stucco. They’ll send you free sample cards if you ask.
Cote-L Distribution Co.
4064 S. Atchison Way, Suite 301
Aurora, CO 80014
1-303-690-7190
https://www.durabakcompany.com/ - JC Whitney: No-name, DIY liner for $17/qt. It’s not as indestructible as Durabak, but it’s a lot cheaper and still works well. Five coats will be about .1″ thick (if that). The texture is like a fine stucco. It comes in black (part # 14YN7962Y) or blue (part # 12YN0871P).
JC Whitney
1 JC Whitney Way
PO Box 1000
La Salle, IL 61301-0100
1-312-431-6102
http://www.jcwhitney.com
After reading lots of discussion about which one is best, I chose to follow Damon Gentile’s lead and go the cheap route. In the fall of ’97, I ordered three quarts of JC Whitney’s generic, paint-in bed liner for $17 per quart. It comes in black and blue; I chose black to match my Jeep.
The stuff smells like strong plastic model cement and looks like thick paint. There doesn’t appear to be any grit in the liner itself, but applying it with a thick roller (3/4″ pile is recommended) gives it plenty of texture. Applying it with a brush can make it pretty smooth if you prefer that look. The label recommends that you use 3-5 coats, which should be applied 5-8 minutes apart. The liner dries tack-free in an hour, but takes 48 hours to completely cure. It also says that one running foot of a pickup bed requires 0.5 – 1.0 quarts, depending on how thick you want the final result. A narrow Jeep tub obviously doesn’t need quite this much. Damon said he put about 5 coats on his entire YJ tub with 2.5 quarts.
Applying the liner to the tub of my ’95 YJ required the following supplies:
- T-50 Torx driver to remove rear seat belt fasteners
- T-40 Torx driver to remove rear brackets for rear seat
- 9/16″ wrench to remove front brackets for rear seat
- T-30 Torx driver to remove tailgate latch cover plate
- Flat head screwdriver to remove plug in lower corner of tailgate
- Phillips screwdriver for miscellaneous screws
- Degreaser and/or soap to thoroughly clean surfaces to be lined
- Sponge / rags / paper towels to apply degreaser / soap
- Fine sand paper or steel wool to roughen surfaces to be lined
- Paint roller pan, preferably with a perfectly flat bottom area
- 4″ long paint roller with 3/4″ pile (the deeper the pile, the more texture the surface will have)
- 1″ wide brush for areas the roller won’t reach
- 1/2 gallon or so of mineral spirits to clean brush, roller & pan
- Masking tape to plug bolt holes and cover stuff that shouldn’t get lined
- Old newspapers to mask larger areas and prevent spills on your driveway
The proper way to line the entire tub is to remove everything you possibly can before applying the liner. This includes all bolts, seat belts, seats, shifter boot, center console, latch covers, wires/hoses routed to the rear of the vehicle, roll bar padding, and possibly even the roll bar itself. This is, of course, much easier to do with the top off. Any bolts or parts that are in place when covered with liner will be very difficult to remove once the liner is dry, so it’s well worth the effort before application. Once applied, this stuff stays on permanently, so you don’t want to drip or splash it on anything like vinyl, rubber, or cloth. Removing these items completely is the best way to avoid this.
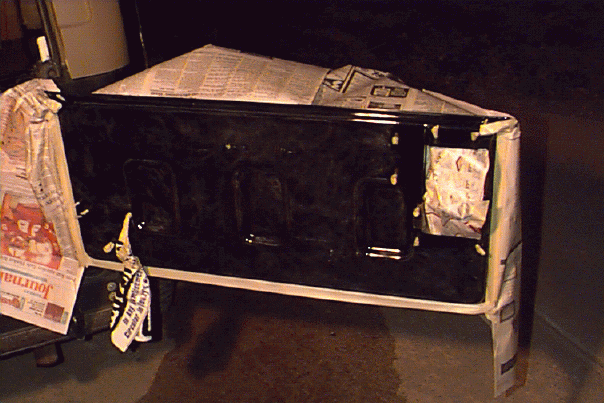
Nebraska’s winter weather and my brother’s engine swap prevented me from finding a full day with good enough weather to line the entire tub this fall, but I did manage to line just the inside of my tailgate one evening this November. The rest of the tub will likely have to wait til next spring 🙁 Consider this an extended test run.
While applying the liner was pretty simple, preparation and cleanup took forever. It’s amazing how well those stock carpets trap dirt–I found red dust under them from my March Moab trip! The gear oil I spilled in the rear of my tub in October still had a residual film, requiring a good wipedown with a degreaser. (I did all that before I realized I was lacking the correct Torx driver to remove the seat belts.) The label says a good degreasing is important to ensure that the liner will stick well, but Damon applied it over top of an ATF spill on his tub and said it stuck like glue. YMMV.
Removal and reassembly of all the accessories also takes longer than you might think. From the tailgate, I removed:
- The plate covering the latch assembly. I didn’t line the outside of the plate, but should have and will when I do the rest of the tub. Some newspaper was shoved in the opening to protect the latch assembly.
- The plastic cover for the wiring contacts on the bottom passenger side. The bracket was wrapped in newspaper, and the wire was wrapped in tape to keep it clean. The bracket was unscrewed from the gate but left hanging from the wire. Complete removal wasn’t necessary because the wire was stiff enough to hold the bracket out away from the gate.
- The top of the door seal on each side. I removed the screw and wrapped the top of the seal in tape, but didn’t bother removing the entire seal. Masking the rest of the seal off with tape was sufficient.
- The spare tire and brake light. I wanted to extend the liner over the door lip and down the angled portion of the outer door, and the light & tire were in the way. Masking tape created a straight edge for the liner along the bottom of the angled area, and newspaper protected the spare tire bracket from overspray. All bolt holes were plugged with rolled up masking tape. Getting this liner inside a bolt hole would probably require re-tapping the hole before you could get the bolt back in.
Once everything was completely removed and masked off, I lightly buffed the surface to be lined with 320 grit sand paper. Finer grit would probably be better, but that’s the best I had.
Sanded tailgate
I used about half a quart of liner on the tailgate. You should first use a brush to go around all the small stuff that the roller can’t reach. The brush yields a pretty smooth texture, but you can tap the end of the brush to rough it up a bit. It took a little bit to get the 3/4″ pile roller saturated with liner, but once done, it left an awesome texture on the larger surfaces. If you did a good job masking things off, you can cover just about everything with the roller, yielding a nice, rough texture across the entire surface. The 5-8 minute wait between coats gives the previous coat just enough time to set up before the next coat is applied, but still doesn’t let the liner in your paint pan dry out.
I only put about three coats on the tailgate, which wasn’t very thick. That’s probably partly due to the vertical surface not allowing thicker coats to just sit there and dry, and partly due to my not waiting long enough between coats. I’ll put at least 5 coats on the bottom of my “bed,” since that sees lots of abuse.
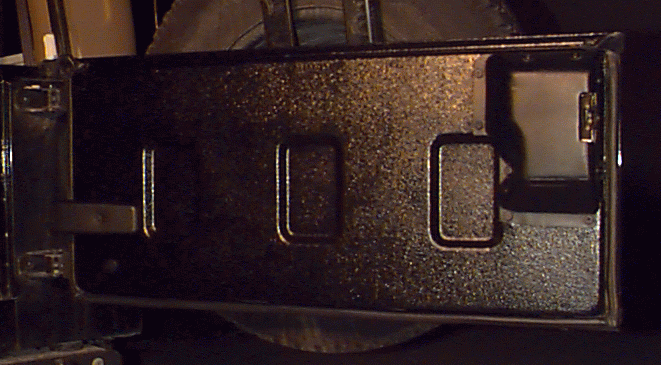
With liner applied
The resulting texture resembles a fine stucco. It’s very similar to the Durabak that Nick Falcetto lined his YJ tub with. You could probably scrape your knuckles pretty bad if you hit it hard enough. After four months of abuse with my toolbox and Hi-Lift rubbing against it, I can say it’s durability is marginal. One spot on the liner has rubbed the paint off my jack handle, while causing no wear to the liner. In another spot, the jack handle’s receptacle has rubbed the liner down to the primer while also rubbing the paint off the jack.
I let the tailgate dry for about 60-90 minutes while I cleaned up. Cleanup was a bear. The 3/4″ pile roller holds an unbelievable amount of liquid, so be sure to squeeze it out and dump it back into the can. Cleaning off the roller was the hardest part of the aftermath. I’d recommend painting everything in one shot and then tossing the roller when done. Cleaning the pan was a lost cause. Using a disposable plastic liner would have been a good idea.
I lined the bottom of my “bed” the next spring. After a couple thousand miles of carrying a metal toolbox and a loose York compressor around in the back end, the liner was badly scraped up, and had worn through to bare metal in several places. While the liner may be suitable for lighter-duty applications, it clearly isn’t durable enough to stand up to the abuse of a cargo area. I’ve decided to save my remaining 1.5 quarts of JC Whitney liner for some low-impact application and get something more durable to line my Jeep tub.
Damon has made the following comments regarding its durability:
- Watch out with lacquer thinner on the liner – I discolored (okay, deshined) a patch last night…
- I can’t find Damon’s original words, but he mentioned scratching it mildly with a wrench or something once also.