
With a 6″ SOA lift and 33″ tires, my YJ stands about 9″ taller than stock. This puts my headlights roughly 3.5 feet off the ground. That’s convenient when driving down deserted roads in good weather, but it sucks in rain or fog, because even my low beams are so far off the ground that they hardly do any good. I’ve been thinking about installing some lower fog lights for some time, but I didn’t want to put them somewhere they’d get crushed the next time I went wheeling. When some friends and I decided to make a night run during our planned Colorado wheeling trip, I decided it was time to finally get my act together and wire up some auxiliary lighting.
I had two requirements for lighting: it had to be useful both on the highway (as true fog lights) and off road to illuminate whatever rock I was about to run over. This pretty much required that they be mounted underneath the bumper. Since I wouldn’t be using it that often, I wanted it to be cheap.
I found what seemed to meet my needs at Advance Auto. The Night Blaster QH-6IC lights are tiny little buggers 2.5″ wide, 2″ tall, and 2″ deep. They’re 55W with a very wide spread (maybe 150-160 degrees) and a faint yellow tint. For $25 a pair, I figured I could take a chance. I first came home with the QH-6CC, but upon opening the package, the instructions informed me that the CC series lights are driving lights, while the AC and IC series are fog lights. Neither model is labeled as such on the outside of the package, unfortunately.
I decided that the best location for these lights was behind and below the factory front bumper, just outboard of the frame. I figure the shackles and bumper should provide them sufficient protection from large boulders and idiot drivers, and they’re small enough that I shouldn’t have to worry about hitting them with my tires. From this spot, I can point them straight ahead when on pavement or angle them outward and downward a bit to better illuminate my tire path when rock crawling at night. To mount them, I bolted a 2.5″ wide by 5″ long by 3/16″ thick steel plate extending rearward from the bottom edge of my bumper just 1.5″ outboard of the frame. The lights are then bolted to the bottom side of this plate. Unfortunately, the passenger side light would have been obscured by the license plate, so I moved the plate 8″ toward the center by keeping the inboard mounting hole and drilling a new one 8″ inboard of it. This places it fully between the shackles instead of directly over the right side shackle.
Running proper wiring seemed to be the hardest part of this project, mainly because all my usual sources were out of many of the parts I needed. I ended up running around to a half dozen different stores (including 3 Radio Shacks, 2 O’Reilly’s, and a Tractor Supply Company) to round up my parts. I wanted to do this right and avoid any fire hazards, so I mounted a low-current switch under the dash and used it to trigger a 30A relay mounted on the fender well protected with a separate 30A fuse. I ran 10 awg wire for all the high-current runs, which should safely handle any additional lights that I may add later. (The factory headlight wiring is 12 awg.)
Here’s the specifics:
I mounted a generic 30A, 5-plug automotive relay to the right inner fender well, just behind the headlight. I ran the power supply line from there into a separate 30A fuse holder and then through the plastic wire sheath along the fender well and up to the outboard end of the power distribution center (the main fuse block), where it attaches to the positive battery cable via a ring connector around the mounting bolt. The power output line for the left fog light runs from the relay down to the frame rail, where it enters the plastic wire sheath that runs across the bottom of the grille in front of the radiator. It exits near the left frame rail and runs under the decorative plastic piece (where a winch mount really belongs) to the bumper and down to the light mount. The right side light splices into this line over by the right frame rail. I used soldered connections protected with heat shrink tubing. (I really need a bigger soldering iron if I’m going to keep working with 10 awg wire!) Ideally, all of the exposed 10 awg wiring should be protected by plastic sheathing to protect it from wear and prevent shorts.
The 18 awg ground wire for the relay control runs all of 6″ to the ground terminal behind the right headlight. The 18 awg switched supply line for the relay control terminal takes a winding path through some existing plastic sheathing along the right fender well, across the top of the firewall, and through a large rubber grommet into the dash area. From there it runs above the steering column to the illuminated rocker switch, which I mounted right below my headlight switch. From the switch, I tapped the line into the factory headlight supply line, which (on my ’95 YJ) is a pink wire with a red tracer that runs from the back of the headlight switch. Any wire will do, but you probably want one that’s constantly hot (regardless of the ignition switch setting) and one that’s easily accessible. The pink/red headlight switch fits that criteria.
Boy, that description sure sounds simple. It took me a week of evenings to get all this hooked up. Maybe I’m just slow.
If you plan to use your lights on pavement as fog lights, you’ll need to aim them properly. The factory service manual has this to say about that: park on a flat, level surface 25′ away from a flat wall, pointing straight at the wall. Make sure the vehicle is sitting level with an average load in it and a nearly full tank of gas. Mark a spot on the wall that’s directly in-line with the center of your vehicle. Mark spots that are directly in-line with your lights (the same horizontal distance from the center line on the wall as they are from the center line on your vehicle). These marks should be the same height off the floor as your lights. Fog lights should be adjusted so that the center “hot spot” is located 4″ directly below the marks on the wall (straight ahead and down a bit). Headlight low beam adjustment follows the same procedure, but only points 1″ below the mark on the wall. Here’s the diagram (below). Proper light adjustment should keep oncoming vehicles from flashing you as they go by.
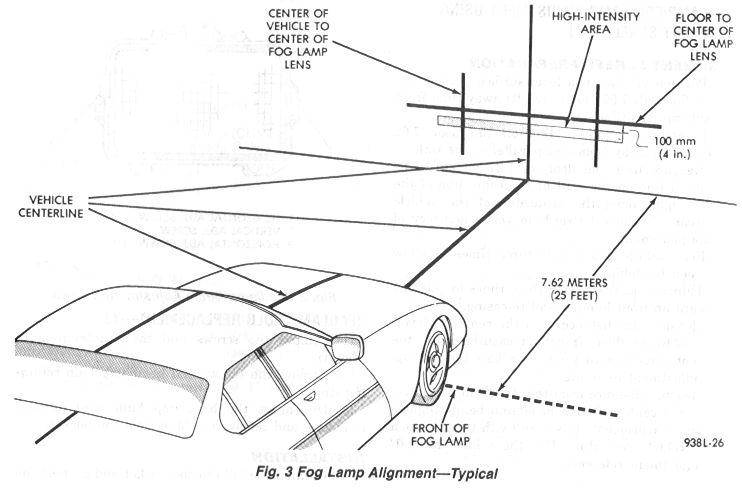
Fog lamp alignment