Fixing a Dysfunctional Door Lock
in a '95 Jeep Wrangler
In the first nine years that I owned my YJ, I twice had the outer door lock on the passenger side hard door break. The lock would work just fine from the inside using the rocker lever, but when I tried to unlock it from the outside with the key, it would only move the lock linkage half way open, which isn't good enough. This usually happens in cold, winter weather, when the grease on the linkage inside the door gets stiffer and the linkage gets harder to move.
(This applies to all full hard doors for '81-86 CJ-7's and '87-95 YJ's. I've never seen the inside of any other doors, but the principles are probably the same.) The problem is that there's a rather flimsy Z-shaped bracket inside the door that connects the key cylinder to the lock linkage. When there's a lot of resistance in the linkage, this bracket will bend rather than force the linkage to move. Once bent, it'll stay bent until you dismantle the door to bend it back and lube the linkage. Until this happens, you'll be forced to climb through the opposite door in order to unlock the faulty door from the inside, since the key will no longer work from the outside. Fortunately for me, it's always been the passenger door that was broken, not the driver side.
Here's how to fix the problem.
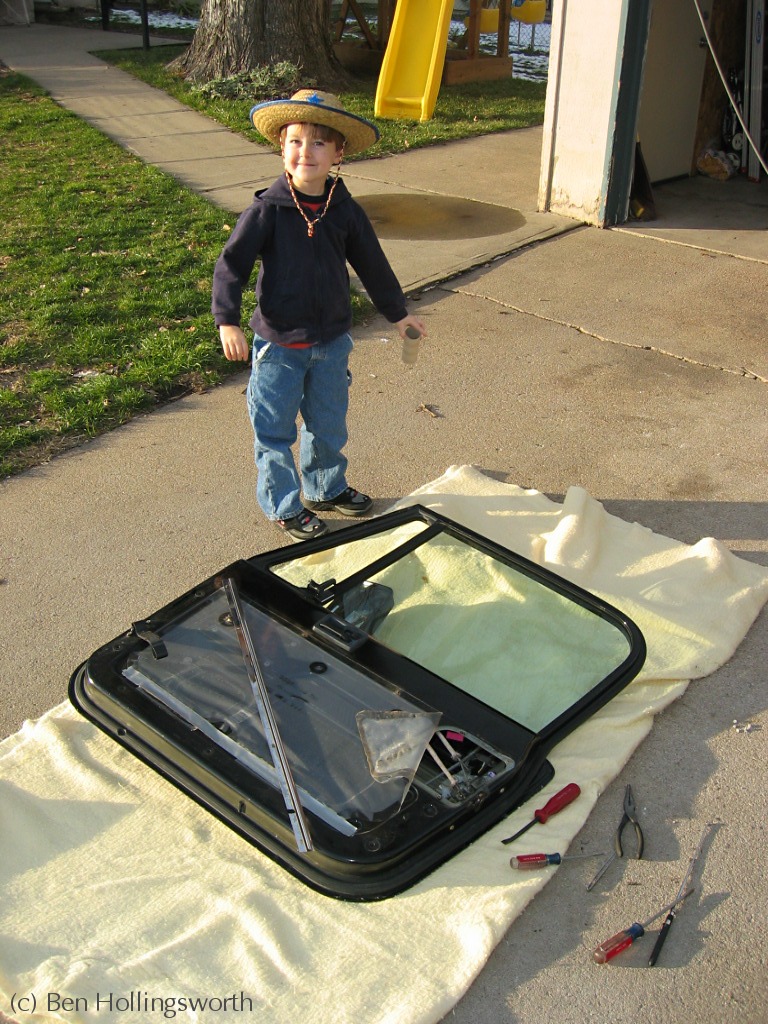
First off, I found that this entire process is easier to perform if the entire door is removed from the Jeep and laid face down on a blanket with the interior facing up. If you leave it attached to the Jeep (like I did initially), gravity will constantly be working against you. Besides, because you'll probably be doing this fix in cold weather, the ability to remove your door and fix it in your living room will provide a welcome change of venue. Try not to do that while your wife is around.
The first real step is to dismantle the door so you can see the lock linkage. Using a very tiny flat-head screwdriver or a strong fingernail, remove the center cap from the base of the window crank. Using a T20 Torx driver, remove the screw that holds the crank to the shaft and pull the crank off the splined shaft. Unscrew the door pull strap with the same T20 driver and set it aside.


Next, stick your finger under one bottom corner of the interior trim panel and pull the panel away from the body of the door. It'll sound like you're breaking something, but you're not (or at least you shouldn't be). This panel is held to the door body on the sides and bottom using press-fit plastic rivets. There's one every 6" or so. Once the panel has been pulled free of all the rivet holes, it will slide down out of the chrome channel that runs across the top of it.
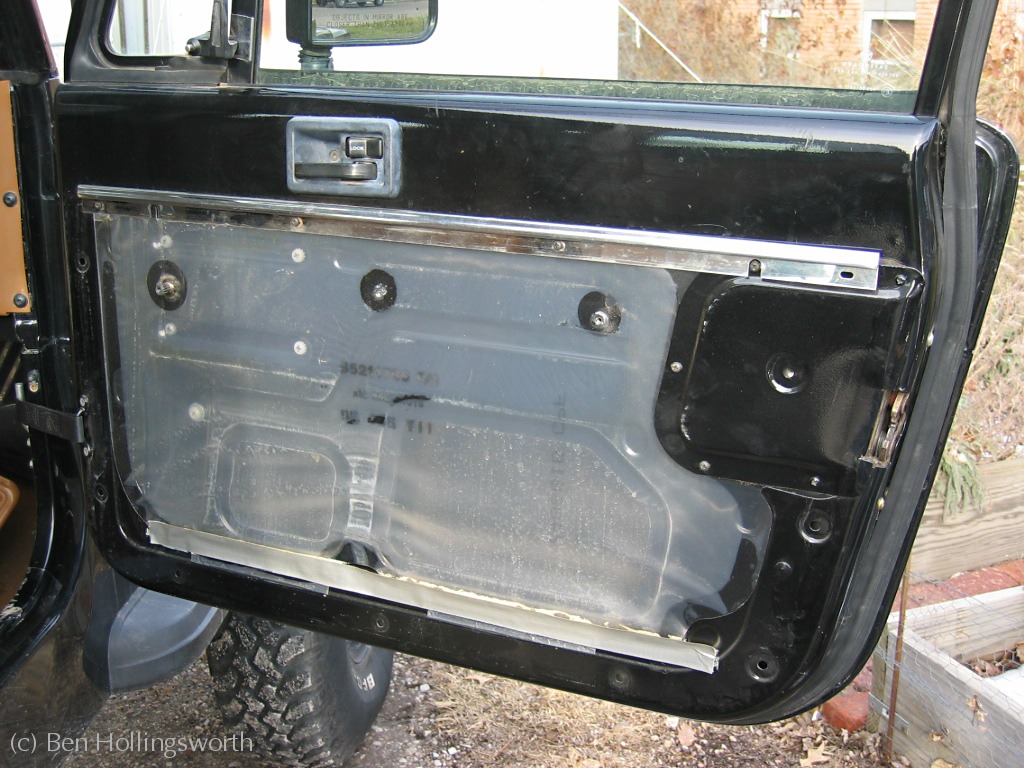
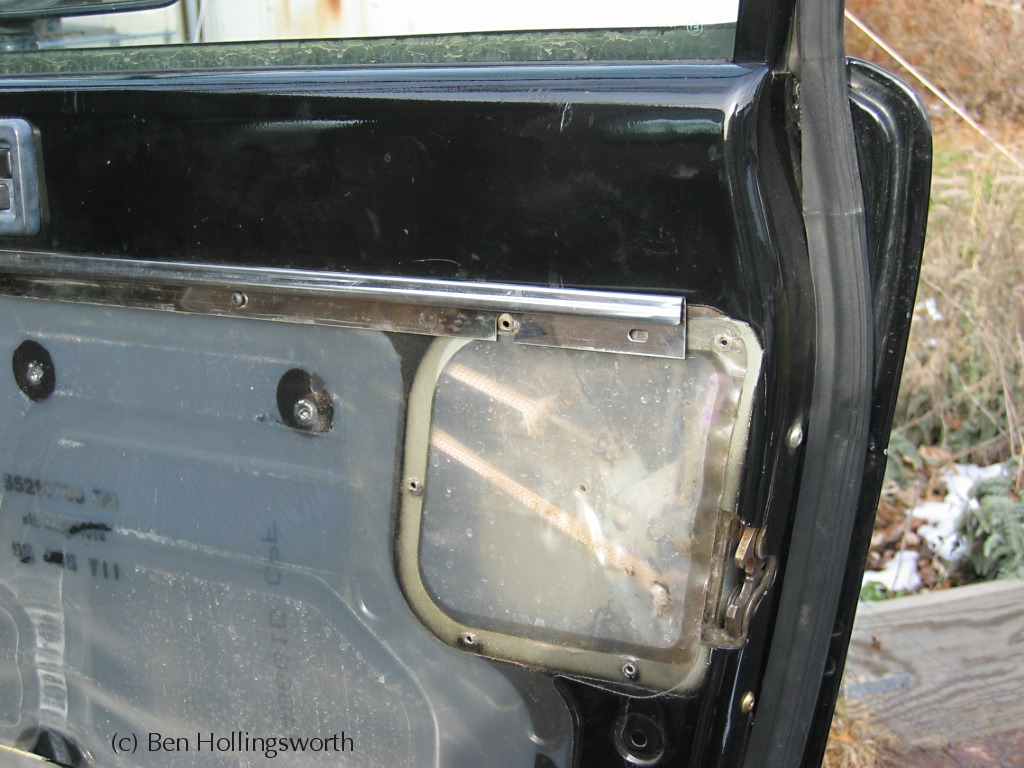
Unscrew the chrome trim panel with a philips screwdriver. Unscrew the metal cover plate that covers the latch mechanism near the upper rear corner of the door body. Gently pull back the plastic moisture barrier that covers the square-ish hole by the latch. If necessary, use a razor blade to separate the plastic from the door body. You only need to remove the part around the latch; no point in removing the plastic from the entire door.
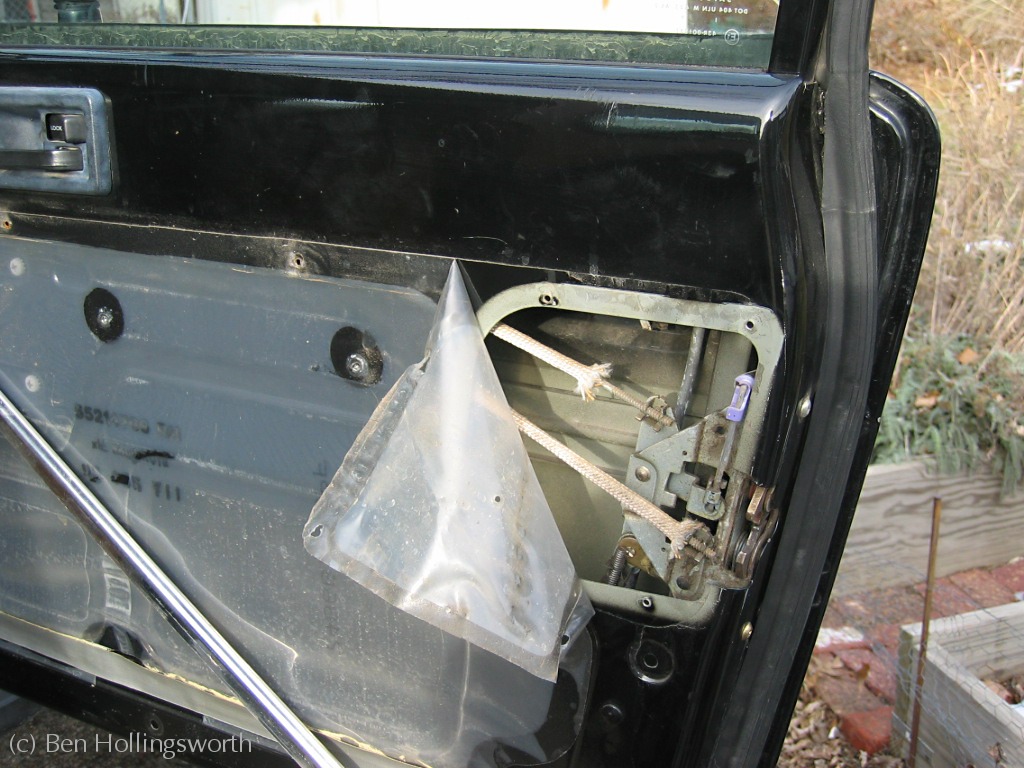
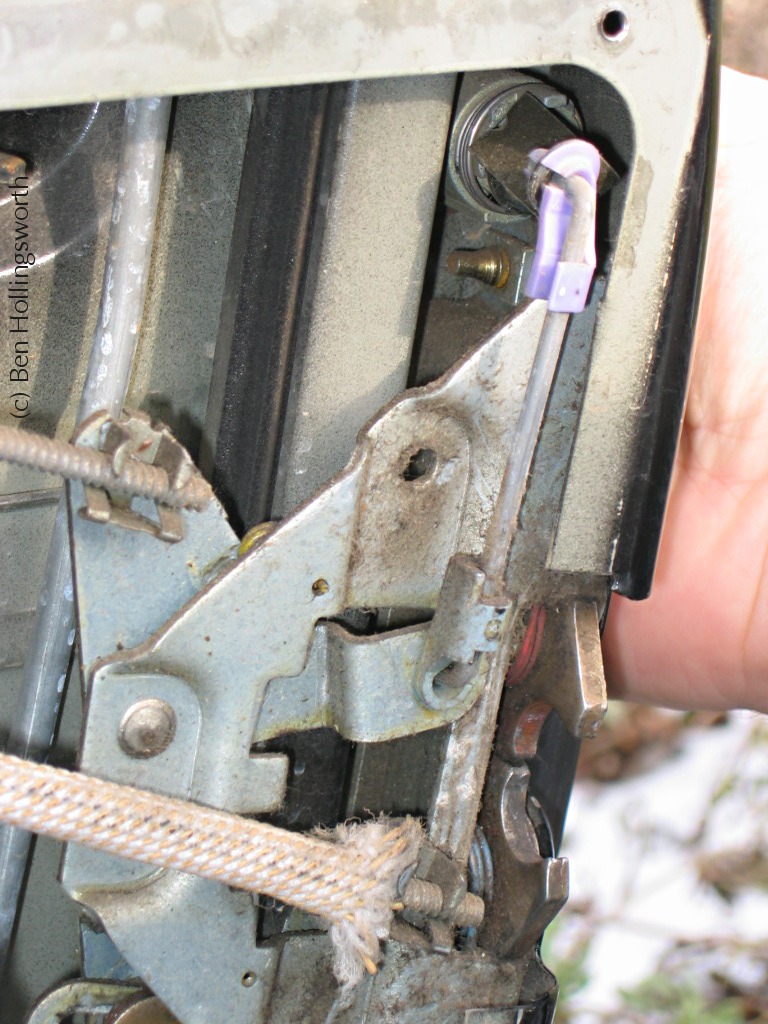
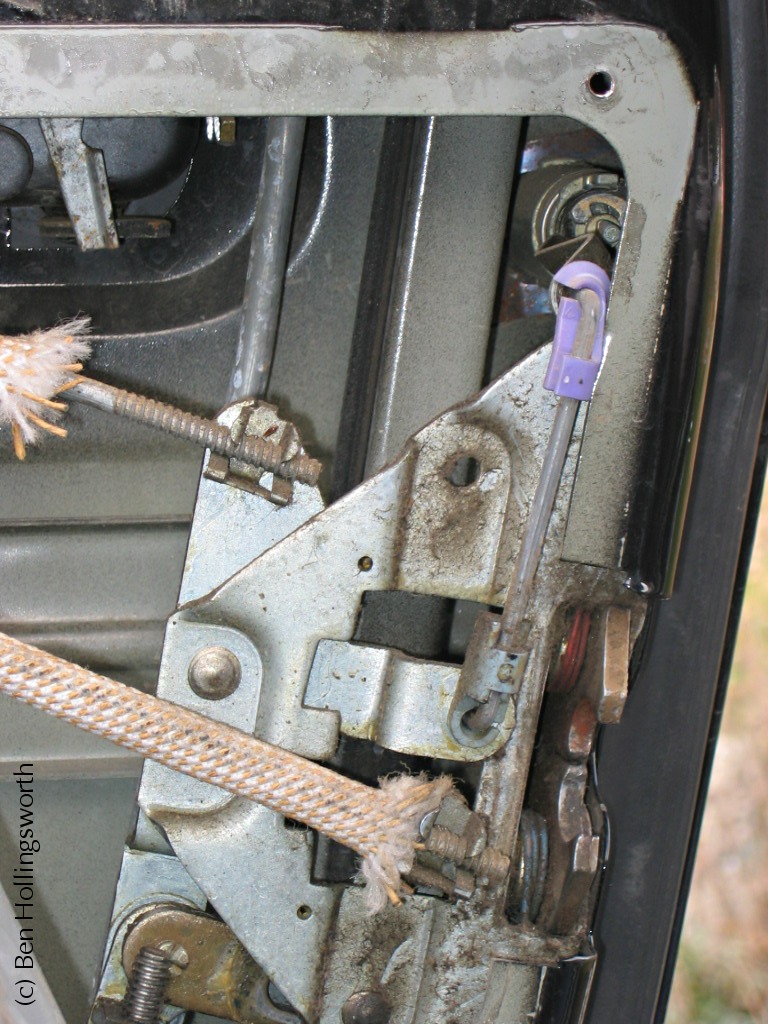
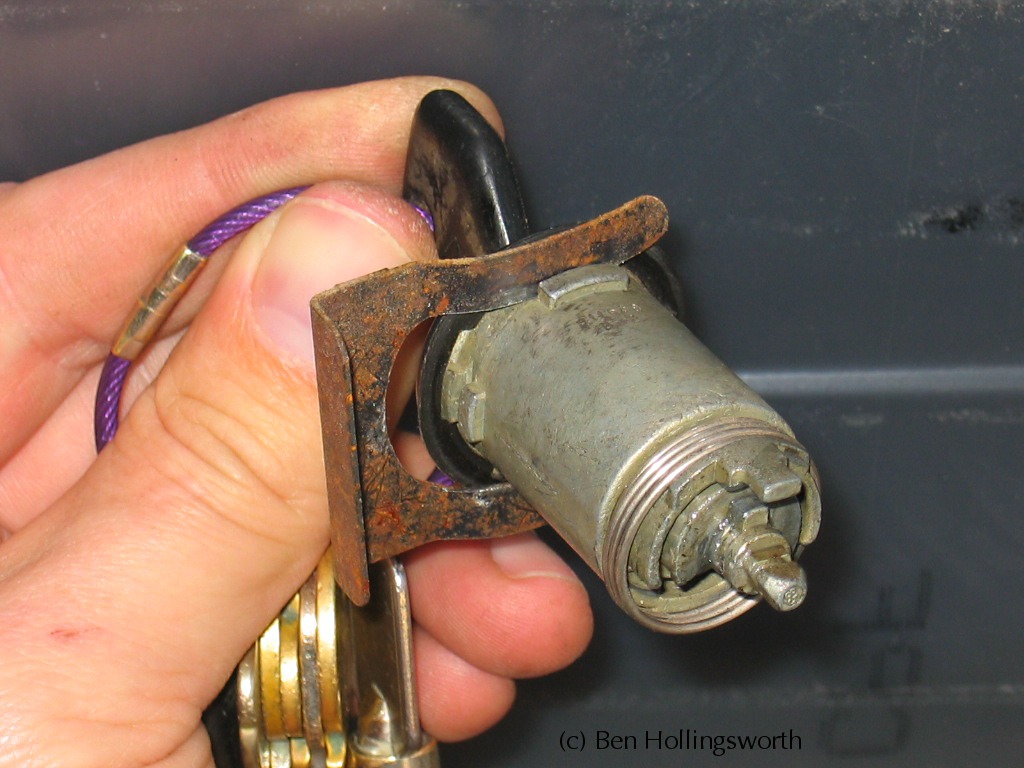
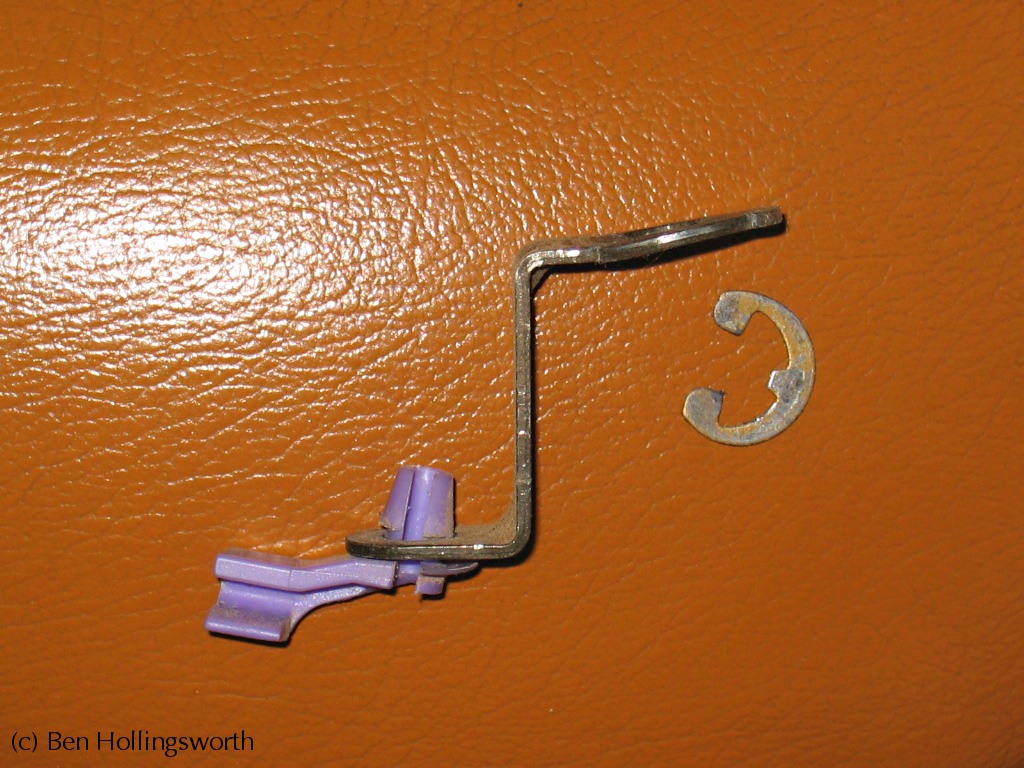
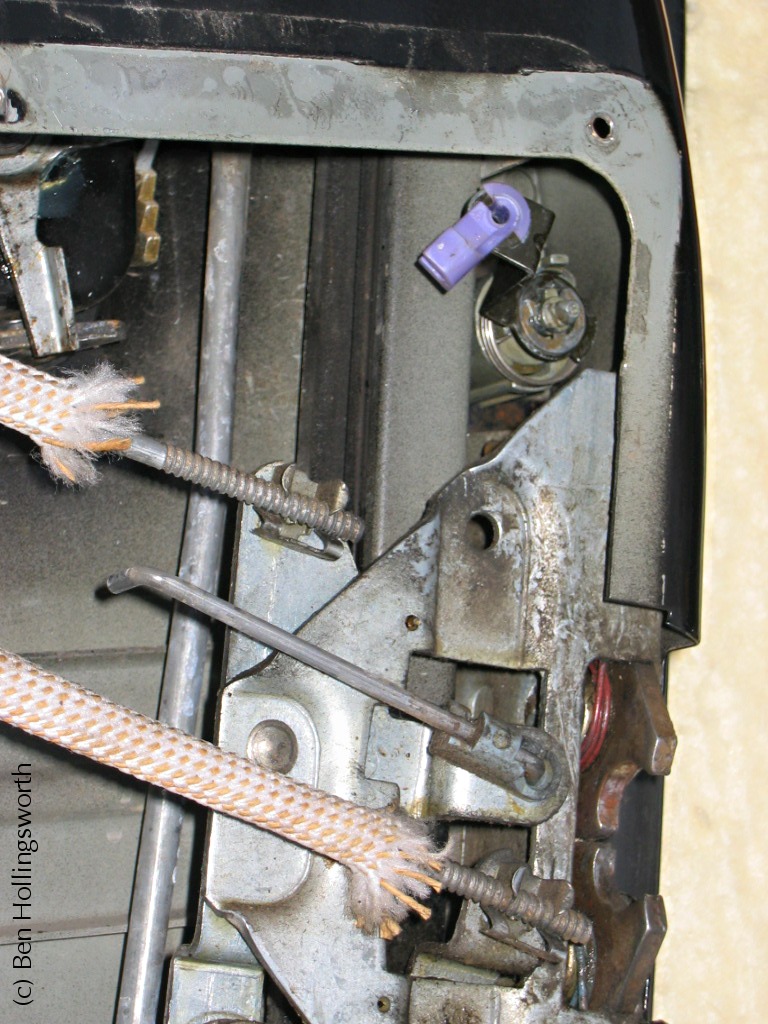
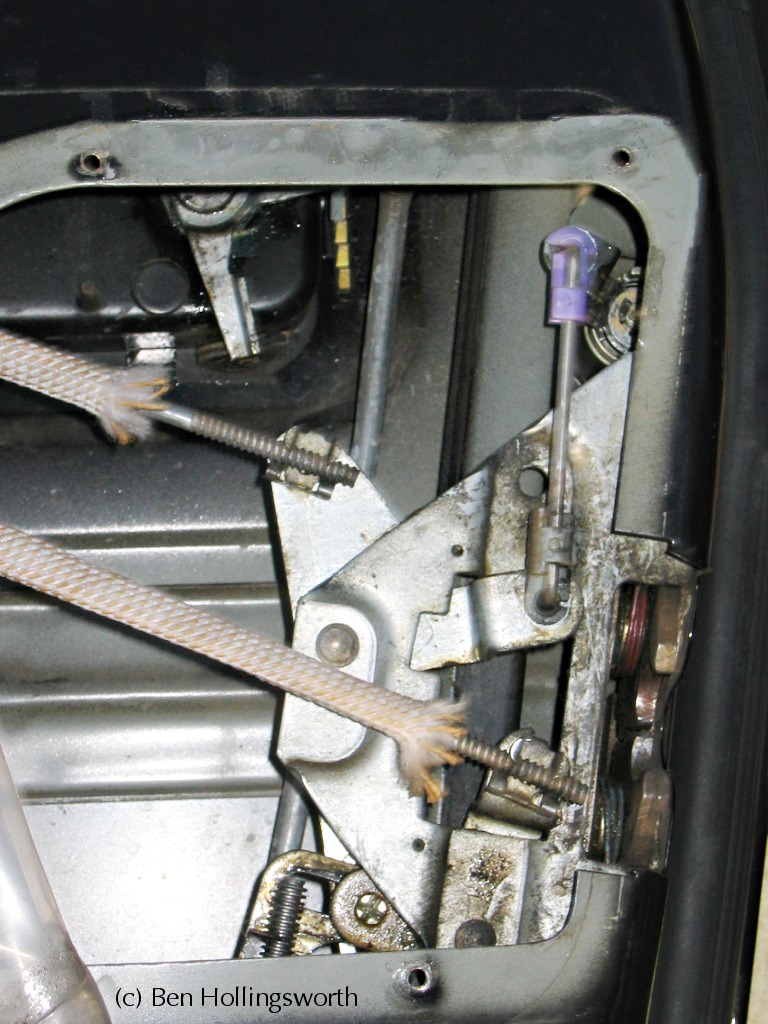
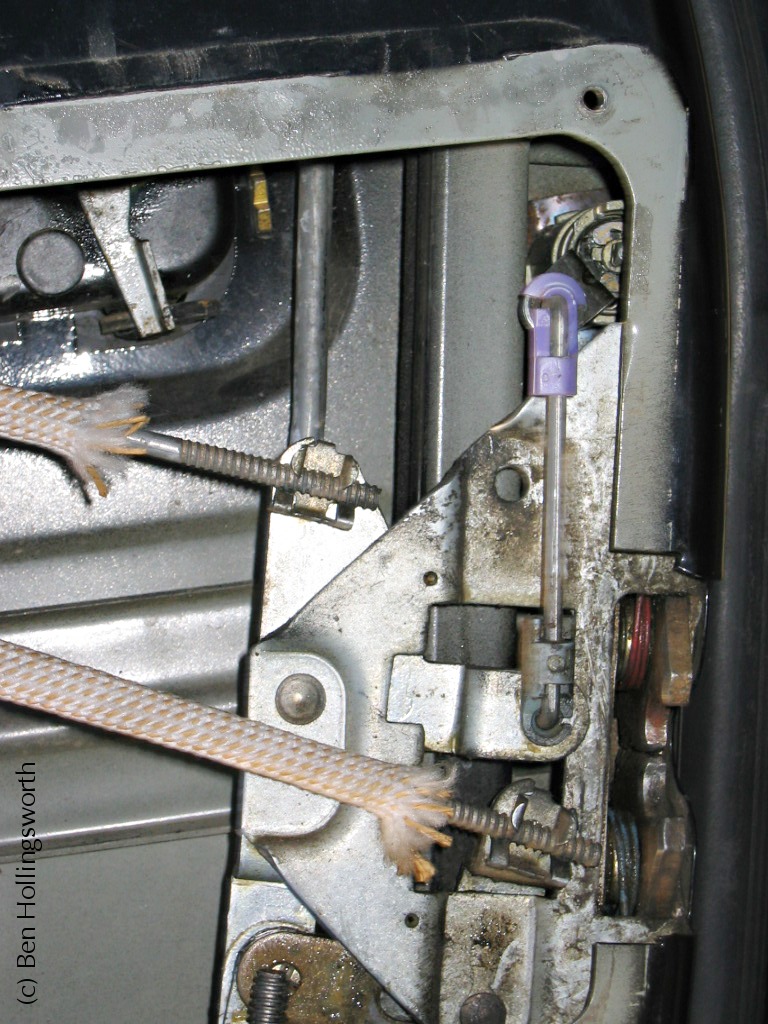
The linkage that must be moved is a little 4"-long rod right in front of the latch mechanism at the rear edge of the door. The rod is connected via a lavender clip to a Z-shaped bracket (two right angles facing away from each other -- more like a step than a Z). At the other end of the bracket, it is connected to the key cylinder with an E-clip. This bracket is the one that is bent and must be straightened. If you put your key in the lock and turn back & forth, you'll see how far the bracket can move. If you then lock and unlock the door using the inside lever, you'll see how far the linkage needs to move in order to fully unlock the door. The problem is caused by torque on rod end of the bracket twisting it and forcing that end closer to the center line of the key cylinder.

Before you get too far into fixing the problem, this is a good time to get out an old toothbrush and compressed air and clean as much crud as you can out of the latch/lock mechanism. Don't use solvents unless you plan on completely dismantling everything and applying new grease, since the solvents will remove the old grease. Regreasing actually isn't a bad idea if you've got the time. I'd recommend white lithium grease. If you don't have the time, then just clean off all the fuzzy crud and spray all the joints down with silicon spray. Move the lock mechanisms repeatedly (using the inside lever) to work the new lube into where it needs to go. Move both the lock and the latch lever. This alone made a world of difference in how easily my door unlocks, even from the inside. The easier this mechanism moves, the less likely you are to bend the bracket again later on. In fact, it might be wise to perform this bit of preventative maintenance on the other door even if it hasn't malfunctioned yet. Now, back to fixing the problem...
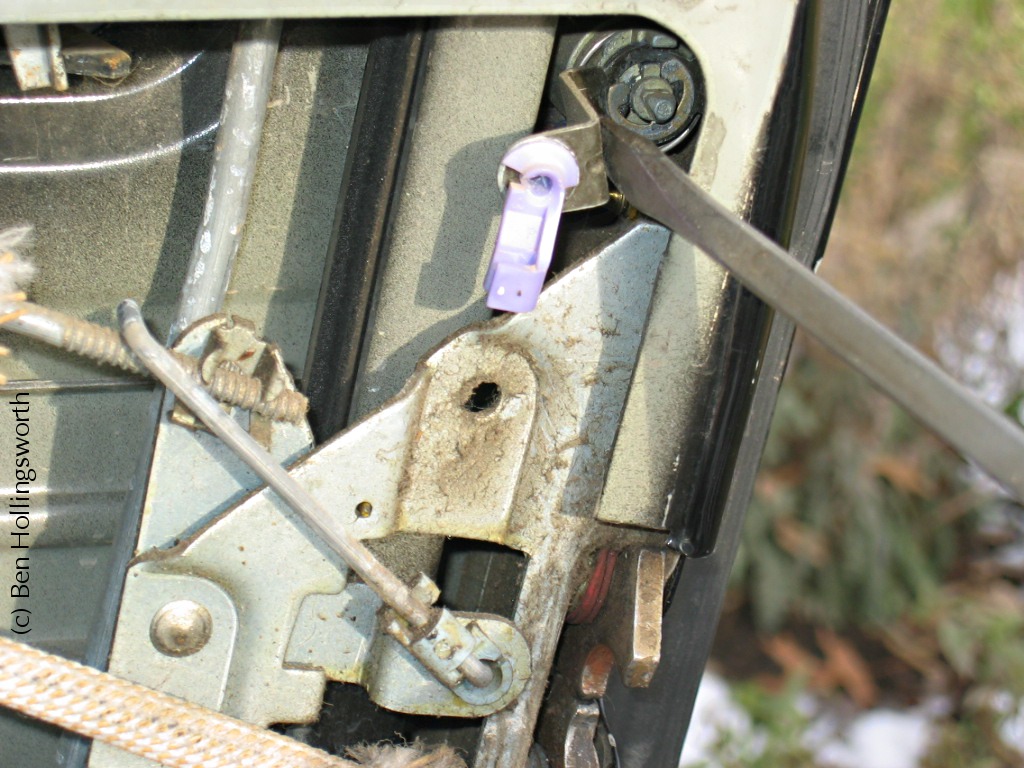
Here's where you need to make a choice. If you're lucky, the damage to the bracket is minor and you can bend it back into the proper shape by prying on the rod end of the bracket with a large screwdriver. If you're unlucky, you'll need to remove the bracket from the door in order to either bend it back into shape or replace it altogether.
If the former, then you really didn't even need to remove the door from the Jeep, unless it was too cold or dark to do the job outside. Hopefully you're reading this before you begin the process. Bend the rod end of the bracket forward (away from the center line of the key cylinder). Test your results by trying to unlock the door with the key. Make sure you bend it plenty far, not just the minimum required to get the lock to release.
If the bracket is bent really far or needs replacing, then your job just got a lot more complicated. In my case, the base of the bracket (by the E-clip) was twisted (this was the second time I had bent it back into shape), so I had to keep pulling things apart so I could bend everything back the way it belonged. First, disconnect the rod from the lavender clip by spinning the clip sideways to release the "arm" of the rod, then pulling the end of the rod out of the hole at the center of the clip.
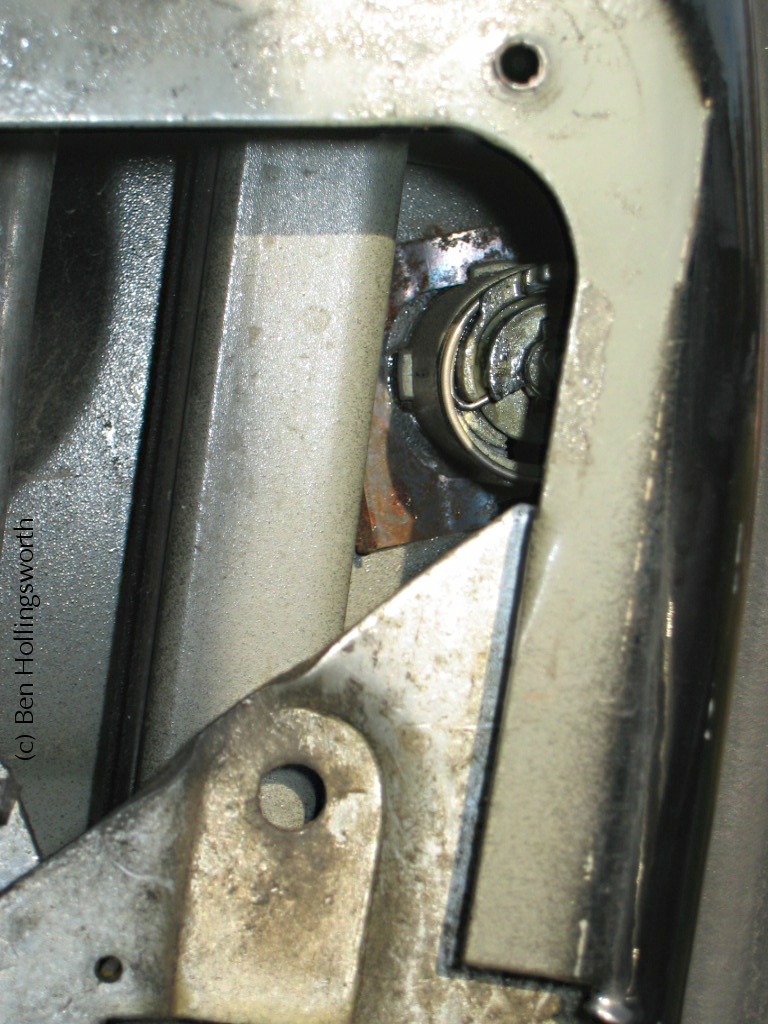
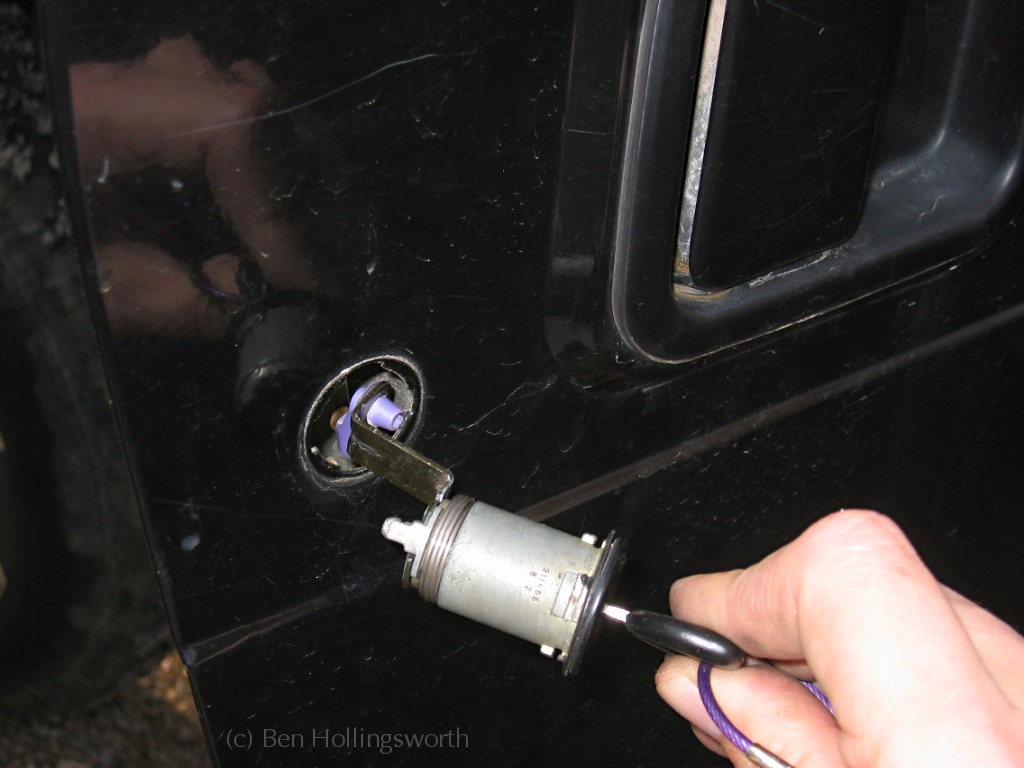
The easiest way to replace the bracket is to remove the entire key cylinder from the Jeep. Removing the little E-clip that holds the bracket to the key cylinder is pretty simple to do with the cylinder still in place, but I challenge you to get that E-clip installed again once the bracket's been replaced. The key cylinder is held in place with a U-shaped metal spring clip that slides next to the inside of the body skin and fits into grooves on the cylinder. The U-clip has a lip on its forward side that you can use to pry the clip on and off. The lip (and perhaps the entire clip) is obscured from obvious view by the window track channel that runs vertically right in front of the cylinder. This channel also makes it hard to remove and install the clip, but it's really not so bad if the door's lying down flat so you're not fighting gravity at the same time. Using the lip at the forward edge of the clip, pry the clip forward to release the key cylinder, then snake the cylinder and bracket out through the hole in the body skin.
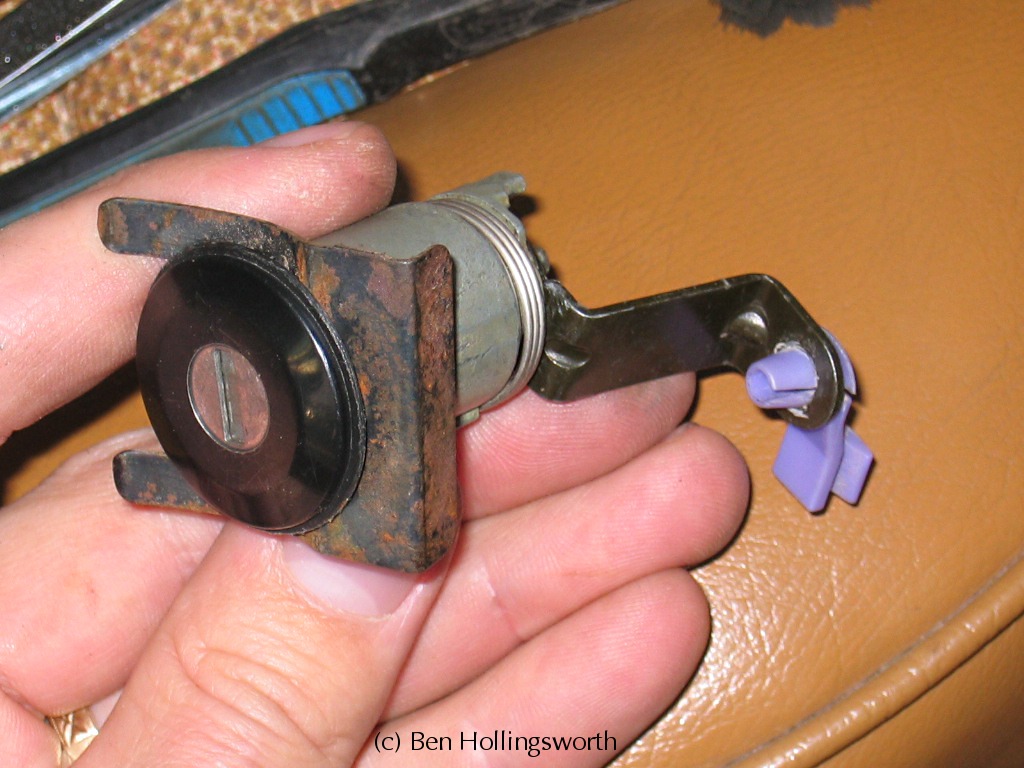
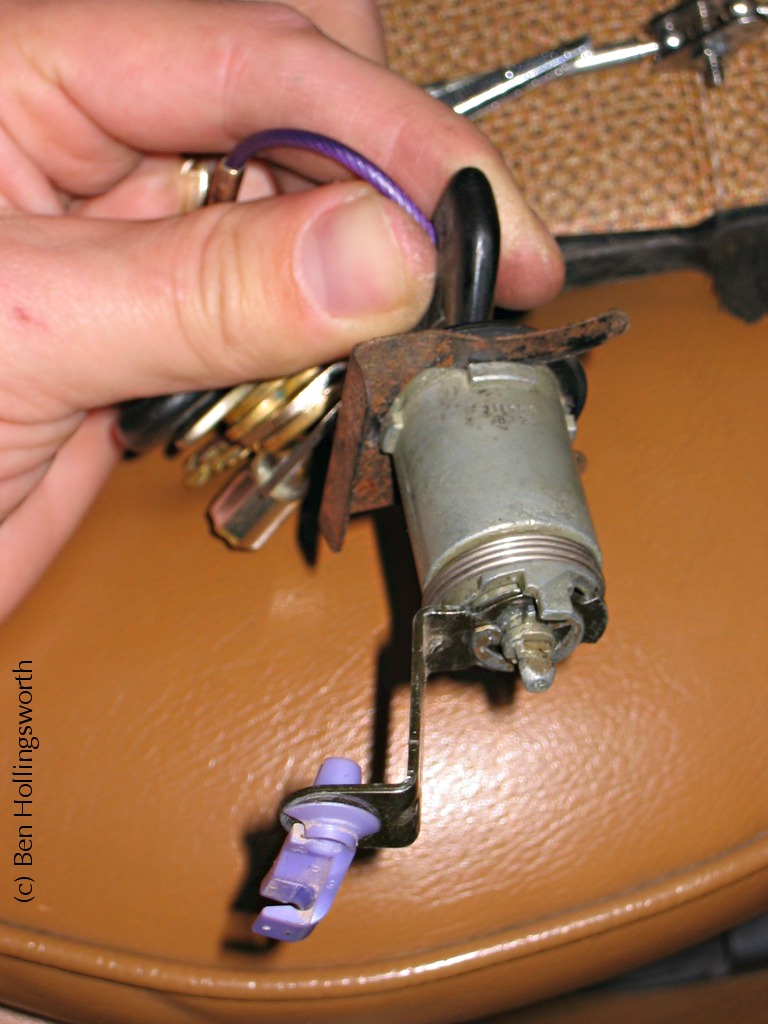

Once the cylinder and bracket are out, you can easily remove the E-clip and remove the bracket. Either replace the bracket with a new one or bend it back straight again. I considered breaking out my welder to beef up the bracket so I wouldn't have to do this again, but it didn't seem worth the trouble. Replace the bracket on the key cylinder and reattach the E-clip. While the key cylinder is out, lube it up with dry graphite powder. Don't use grease or silicon spray, because those will attract dust which can't easily be cleaned from the inside of the cylinder.

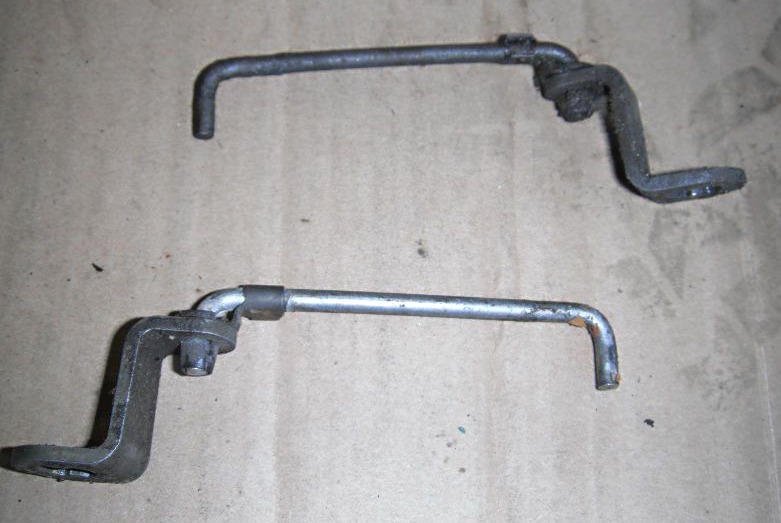
If you want to replace your Z bracket with a new one, here's a few leads. Back in 2005, Rob Zwissler wrote to tell me that he found a new Z bracket online for his '95 Wrangler. The Jeep part number is 55076390. Unfortunately, the retailer from whom he bought the part is no longer in business, and Jeep probably doesn't supply parts that old any more. If you find somebody selling these brackets, PLEASE let me know so that I can update this page and help other people in this same predicament. I'm told that junk yards are aware of how fragile these brackets are, and tend to save them for full door buyers rather than selling them individually. I've seen photos of Z brackets from older YJ's (like the '88 pictured below) which are much beefier than the brackets from my '95 YJ. I can't swear that they're interchangeable, but it would certainly be worth a try, since you'd never have to worry about bending them again.
Now it's time to reinstall the key cylinder in the door. Make sure that the gasket between the door skin and the outer end of the cylinder is flat. Replacing the U-clip around the cylinder requires some creative poking and prying with a screwdriver. I found the curved end of an 8" pry bar to be helpful. This is the part that's nearly impossible to do if the door is still hanging vertically from its hinges. You'll see a rod that sits right in front of the window channel. It helps if you disconnect the upper end of this rod from its post (cotter pin) and move it a few inches out of the way. Don't forget to reconnect it when the U-clip is in place.


Reconnect the original rod to the lavender clip in the bracket, then verify that you can indeed unlock the door using the key. It would suck to do all this work, only to find out that you didn't bend the bracket far enough to make a difference. Double check that you've reconnected everything they way it belongs.
Replace the plastic moisture barrier over the latch hole. Screw the cover plate back into place. Screw the chrome trim channel back into place. Fit the top of the trim panel into the channel, then press all the plastic rivets into their original holes to hold the panel in place. Reattach the door strap and the window crank. The crank can be oriented on the splined shaft any way you like it. I prefer to point the crank up and forward at a 45-degree angle when the window is closed so that I don't hit it with my knee. Reinstall the door on the Jeep (if necessary). Enjoy your fully functional door.
Do you like this site?
Help me keep it going by throwing a few pennies my direction.
![]()
![]()
![]()
![]()
Created 1 Dec 2004
Last updated 12 Oct 2011 Obi-Wan (obiwan@jedi.com)
Links on this page to Amazon are part of an affiliate program that helps keep Jedi.com operational. Thank you for your support!
