Wiring Our New House
This page isn't finished yet, but then, neither is our remodeling project. I'll update the page as the project progresses.
As part of our kitchen remodeling project, we ended up gutting the two outside walls. Upon doing that, we realized that the balloon architecture and 20-foot studs provided us with a clear path from the basement to the attic by drilling through just the top plate in the attic and the base plate along the kitchen floor. Being the forward-thinking, ISP-owning computer nut that I am, I saw this as an opportunity to run various cabling to the attic in preparation for bringing the house wiring from the 19th to the 21st century.
Before we started the renovation, all the 110V wiring was two separate wires run along opposite sides of each stud space with porcelain insulators. The service entrance had been updated to pushmatic-style breakers at one point, but with only a 100A main breaker. A few of the wires in the kitchen had been replaced with grounded romex. When gutting the walls, we found one old outlet, still with hot wires, that had the wire ends taped off and simply shoved back into the wall with the opening plastered over. Talk about scary. There were two phone lines in the house, with the upper one running through the ductwork up to the master bedroom. Both CATV lines were also run through the vents.
While we had the kitchen walls and ceiling open, we replaced all the old 110V wiring we could reach with romex. We rearranged which outlets were on which circuits (to keep things sane), and added a few more outlets for good measure. We GFCI-protected the two main appliance circuits in the kitchen, as well as the new outlet that we added to the adjoining bathroom (alongside the wall switch that replaced the old pull chain).
Now for the fun stuff. We decided to run stereo speakers, coax, and 4-pair phone/data lines to every room except the bathrooms. The kitchen got two ceiling-mounted speakers that approximately matched the flush-mounted lights over the counters with a wall knob to control the local volume. We ran one phone line to the wall-phone jack to replace the old bell wire, and added another phone/data jack and a coax plug in another wall jack over one of the counters.
We also ran gobs of cabling from the basement to the attic for future wiring of the second floor. Since the entire second level and attic were on a single 15A circuit, we ran two more 12/2 romex lines just in case. We ran 10 coax lines--2 for incoming antenna signals, 2 for each of the three bedrooms/office/craft rooms, and 2 for the attic in case it ever gets remodeled into a play room. We ran 12 cat-5 phone/data lines--enough for 2 per bedroom/attic, plus 4 spares for future use. We ran 8 runs of 22 awg shielded 4-conductor wire to be used for remote IR transmission, local thermostats, security systems, or basically whatever else we think of later. We ran 5 runs of stereo speaker wires--1 per room, including the bathroom and attic.
The initial plan is to put 2 cat-5, 2 coax, and stereo speaker wires into every room, with some exceptions. The kitchen only gets one coax. The main (upstairs) bathroom only gets speakers, probably via a flush-mounted ceiling speaker. The living room gets one cat-5 and one coax by each of the rear speaker jacks, and a whole boat-load of plugs behind the entertainment center.
The exact type of each cable we chose was as follows, and may or may not have been overkill in some situations.
The coax we used was RG-6 Quad Shield. Many homes wired for CATV use RG-59 coax, which is low-grade cable suitable only for short runs of video. Be sure to avoid RG-58 and RG-8, which are designed for use as computer networks and radio antennas, and don't have the right impedance for video transmission. Normal coax contains a copper/steel center conductor, a foam dielectric, a layer of foil shielding, a layer of braided mesh shielding, and finally an outer PVC jacket. Quad shielded coax includes an extra layer of foil and braid to help prevent interference. The cost difference above normal dual-shield coax is minimal, and the improvement in signal quality is noticeable. We got a 1000' spool from Anixter for $102.50.
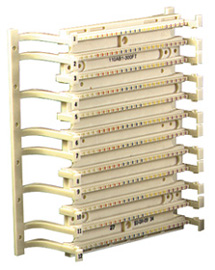
We ran cat-5 UTP (Unshielded Twisted Pair) for all our phone and data jacks. Cat-5 is rated at 100 Mbps network speeds, which is obviously overkill for phones and probably even 10 Mbps Ethernet. Cat-3 is somewhat cheaper and sufficient for phones and 10 Mbps, but like most people, I used cat-5 to allow for any future contingencies. If you do go with cat-5, be sure you don't shoot yourself in the foot by using connectors and punch-down blocks that aren't cat-5 rated. Some wall jacks and all 66-style punch-down blocks are only good to cat-3 or cat-5, so be sure you know before you order. 110-style punch-down blocks should be used for anything beyond voice-only lines. Besides, 110-blocks are smaller, easier to work with, and no more expensive than 66-blocks.
While all network wiring is jacketed in PVC, some of it is rated (by fire codes) for running inside air ducts ("plenums"). Plenum rated cable is more fire-resistant and less toxic (when burning) than non-plenum cable. It also costs 2-3 times as much. I got a 500' spool of plenum cat-5 for $140 from Merisel (or $190 per 1000' from Anixter) to run basement-to-attic, but opted for the cheaper non-plenum PVC ($60 per 1000' from Anixter) for the rest of the house. I figure if my inner walls are on fire, toxic fumes are the least of my worries.
I used 14 awg, 4-conductor Monster cable for my stereo speakers. I got about 315' of it from a local stereo shop (Schaefer's) for $0.75 per foot. 4-conductor cable is much better than a pair of 2-conductor lines for long runs because it's generally cheaper and it's easier to manage. You can probably get away with 16 awg if you're on a budget, but 14 awg is really much better for the extended (100') runs involved in most whole-house audio systems. The Monster cable is more expensive than some other brands (especially when you buy it local instead of mail order), but it's good quality stuff and a joy to work with. The speaker cable was by far the easiest cable to run due to its smooth, flexible outer jacket.
I chose to run some 22 awg, shielded, solid 4-conductor cable as because there are some applications, such as IR transmission and thermostat control, that require the thicker gauge and shielding that UTP doesn't provide. I got a 1000' spool of it (the smallest they'd sell) from Anixter for $70.75.
Interference from other sources is always a consideration when running cables. In general, the more current running through a wire, the more interference it will cause, while the less voltage running through a wire, the more interference it will receive. 15A, 110V power lines give off lots of interference, and should be kept as far as possible from other low-voltage wiring. Speaker wires have both high current and low voltage, and therefor should be kept all by itself, and a minimum of 12-18" from the nearest power line. Cat-5 and coax can coexist peacefully, but cat-5 shouldn't be run near speaker wire (especially at high volume) for great lengths. RG-6 quad shield coax can be run pretty much anywhere. If low voltage lines must cross power lines, do so at 90-degree angles. The longer the distance for which lines run parallel, the more interference you'll experience.
Despite the mostly-open wall, running the home runs from the attic to the basement was still a pain. Although the ideal solution would be to run a couple large conduits inside the wall, there was always some obstruction that prevented us from doing that. The path we chose to run the wire required us to snake the wires past a horizontal vent pipe that ran across the upstairs bathroom wall. This was easy to do a couple cables at a time, but didn't allow enough space for a conduit. In order to avoid interference, we had to separate the cables by drilling three 1.25" holes in our top and base plates, each about 8" apart. The coax, which has the best shielding, ran down the path closest to the 110V lines. Cat-5 and 22 awg ran through the next hole, and speaker wire ran down the last path.
Running the cables is a two-person job. One person drops a string with a weight on one end from the attic down to another person in the basement. Once the string has passed through the correct route, tape the end of 2-3 cables to the string in the attic, and have the other person pull the string and cables down to the basement. The string should be long enough that the attic person still has ahold of the string even after passing the cables down. After each run, pull half of the string back up (leaving one end in the basement) and repeat the process. Once you're done, leave the string in the wall (secured at both ends) in case you ever need to run any more cables later on.
All these wires terminate at wiring panels in the attic and basement, basically just 7/16" waferboard mounted between two wall studs. The attic panel just provides 1-to-1 mappings from the attic-to-basement runs to the yet-unrun wall jacks in each of the upstairs rooms. The basement houses the master panel, which distributes the incoming CATV, phone, and speaker lines to each of the wall jacks. Should we ever get more than one computer, the network hub would be housed here.
Back to Casa de Hollingsworthlast updated 25 Aug 98 Obi-Wan (obiwan@jedi.com)
Links on this page to Amazon are part of an affiliate program that helps keep Jedi.com operational. Thank you for your support!
